VS – Vubis Smart
1 Introduction
This manual describes some general characteristics of Vubis Smart. Subjects covered include:
·
logging in and out
·
the main screen
·
standard options within Vubis Smart
·
navigation
·
options on result screens, like sorting, adjusting column width, etc.
·
options on the menu bar
·
generating output
· starting processes
2 Logging in and out
You will need a login and password to access Vubis Smart. Your system administrator will assign you a login and password. Note that for training purposes these may be generic trainee logins.
·
There are two ways to start using Vubis Smart.
-
Click on the Vubis Smart Desktop Icon which will look similar to this:

or:
-
Click on the Start ![]() button, click Programs - Vubis Smart - Vubis Smart.
button, click Programs - Vubis Smart - Vubis Smart.
The system will start the Vubis Smart client.
You will see the Login screen:

·
Enter your login and password
·
Click or press Enter
You may see a message window.
·
Click or press Enter.
You will now see the main Vubis Smart menu screen:

See section 3 for an explanation of this screen.
2.1 Log out
To close Vubis Smart and end your session you can do one of the following:
·
Press Alt+F4.
or
·
Click the Vubis Smart icon on the left of the Menu bar, or on the left of the Title bar, then click Close.
or
·
Right-click the Vubis Smart button on your workstation taskbar then select Close.
or
·
Click the Exit icon ![]() on the Toolbar.
on the Toolbar.
2.2 Log in with a different password
You can also log in as a different user, without explicitly having to log out first. For this you use the icon ‘’ on the Vubis Smart start screen. The form for entering Login and Password is shown again. This implicitly logs out the current user. See also the Help for AFO 623 for additional information on this option.
3 The start screen
Once the login procedure is completed, the Vubis Smart start screen will be shown:

This screen (like most of the other screens within Vubis Smart) has a number of standard elements:
Title bar
The Title bar is used within Vubis Smart to give you information. For instance the title of the order you are viewing, the details of the borrower whose record you are viewing.
Menu bar
This is a standard Windows menu bar. It offers you general options that are valid (almost) anywhere. Use the left mouse button on a menu to see the options within. See section 7 for more information.
Tool bar
The Vubis Smart toolbar provides various options in the form of icons. The display of icons will change according to the module you are using, and your previous actions. Unavailable options are greyed out.
Status line
The status line is displayed at the bottom of the screen. Seven fields are displayed. Fields may be empty if they are not relevant to where you are in Vubis Smart. The fields are as follows, from left to right:
·
status of the connection to the server
·
the AFO number
·
the institution/location the work station is logged on to
·
the INSERT option on or off
·
the CAPS-lock switched on or off
·
the NUM-lock option switched on or off
·
optionally the date (from the Vubis Smart server).
· the time (from the Vubis Smart server)..
The start screen of Vubis Smart consists of two columns:
Right column
The right hand side displays the shortcuts for the current login. If no shortcuts have been defined, the right column will be empty. See section 3.3 for defining your own shortcuts.
Left column
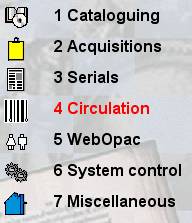
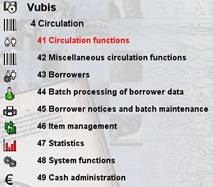
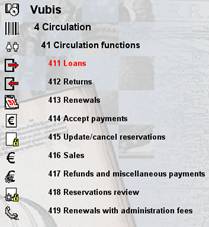
Functionality within Vubis Smart is via an AFO (Activity, Function, Option) number. This is derived from the following:
·
Within each menu or Activity are listed Functions such as the Item management function in the Circulation activity.
·
Within the Functions there are Options.
· For example, items are lent to a borrower in AFO 411 Loans while items on loan are renewed in AFO 413 Renewals.
Options on the screen
: this option allows you to switch between databases. See section 3.1.
: this option allows you to switch between institutions and/or locations. See section 3.2.
: this option allows you to modify your password. An input form is shown:

: this option allows you to create your own shortcuts on the start screen. See section 3.3.
: with this option you can view details of the current user. See section 3.4.
: use this option to log in as a different user. See section 2.2.
: use this option to log out and close Vubis Smart. See section 2.1.
3.1 Change database
It is possible more than one database has been configured on your system. If you have access to these databases, you can use this option to switch from one database to another.
After choosing the option you will be presented with an input form:
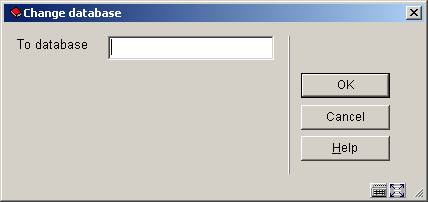
Enter the number of the required database and click . The title bar will now show the name of the selected database.
3.2 Change institution/location
It is possible more than one institution has been configured on your system. Besides this more than one location can be defined within each institution. If you have access to these institutions and/or locations, you can use this option to switch from institution/location combination to another.
After choosing the option you will be presented with an input form:

Enter the code of the required institution and/or location and click . When entering both institution and location, you must separate the codes with a slash, ‘/’. The system will show a message:
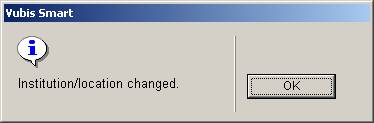
The third area of the status line will now show the selected institution/location combination.
3.3 Parameters
This option allows you to create your own shortcuts on the start screen. After choosing this option an input form will be displayed:
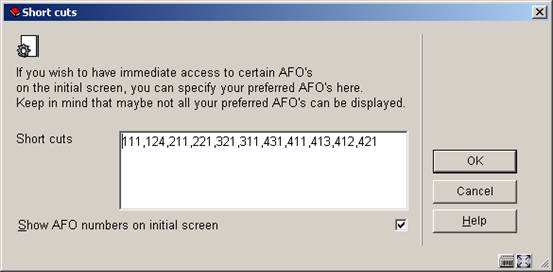
Fields on the screen
Short cuts: Enter the numbers of the AFO’s you want to have shortcuts to, separated by commas. The maximum number of AFO’s that can be entered is 20.
Show AFO numbers on initial screen: check this option to ensure the AFO numbers are also displayed on menu screens.
3.4 Process info
: with this option you can view details of the current user. After choosing this option an information screen will be displayed:
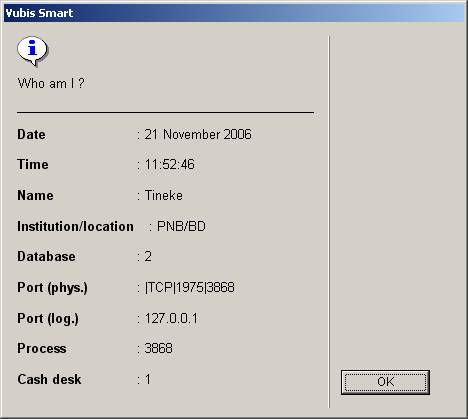
Fields on the screen
Date: current date (from server).
Time: current time (from server).
Name: name of user currently logged in (as defined in AFO 611).
Institution/location: codes of the institution/location combination that the user is currently logged in to.
Database: number of the database the user is currently working in.
Port (phys.): the physical port number of the workstation.
Port (log.): the logical port number of the workstation.
Process: the number of the Caché process for this user.
Cash desk: the cash desk defined for the current institution/location and workstation.
4 Standard options within Vubis Smart
Most commands within Vubis Smart can be given via icons. As mentioned previously, valid icons are shown in the tool bar at the top of the screen.
It is possible to get more information on the actions of an icon. This tool tip is shown when you put the mouse cursor over an icon.
If the tool tip contains the string "(+)" this means you must first select an item from the list on screen before clicking on the icon.
A number of icons can be found on almost any Vubis Smart screen:
|
Icon |
Definition |
Effect |
|
|
Back |
Go back to the previous page |
|
|
Shortcut |
Displays the Toolbar options |
|
|
Help |
Displays the Help files |
Other common icons are:
|
Icon |
Definition |
Effect |
|
|
New |
Use to enter a new item. Depending on the AFO where you are this can be, title, item, borrower, order, etc. |
|
|
Select |
Use to select an item from a list. Displays details of the item selected or performs action on item selected |
|
|
Select all |
This icon is offered when the system shows a list with various items (titles, copies, codes, etc.). Or when a part has an input form with multiple fields. By using this icon, you select all items in the list/fields on the input form at once. |
|
|
Delete |
Use to delete the selected item. Depending on the AFO where you are this can be, title, item, borrower, order, etc. |
|
|
Delete all |
This icon is offered when the system shows a list with various items (titles, copies, codes, etc.). By using this icon you delete all items from the list shown at once. |
|
|
Cancel |
Use this icon to specify you do not wish to use any of the available options. Or use to cancel the last action you performed. |
|
|
Print |
Prints depending on the context. e.g. in Loans prints a loan slip. See also section 8. |
|
|
Next |
Displays the next page when you have a long list. |
|
|
Previous |
Displays the previous page (only available after using the ‘next page’ option). |
The following keys have a special meaning within Vubis Smart:
|
Key |
Meaning |
|
<ENTER> |
OK, or confirmation |
|
<ESC> |
Cancel, or Go back |
|
<F1> |
Help |
4.1 Short cut to all options
Using this icon results in a list of all options valid on this screen. The options correspond with the icons on the tool bar, the texts correspond with the tool tips:

The options actually valid are displayed in black; inactive options are grey.
Let op
You can also display this list by clicking the right mouse button anywhere on the screen (except the grey protected areas).
4.2 Save settings
Many dialog screens have an option at the bottom Save settings. This means information on the form will be saved as default data for the next time you use this form.
![]()
Note
Not all information on a form can be saved as default. For instance on the bibliographic search form you can save “user index” and search string, but not search method or delimiters; on a partial order entry form you can save all data as default, etc.
5 Navigation
Although Vubis Smart can be controlled completely with the mouse, it is possible in almost all cases to use the keyboard instead.
Any option (icon) can be activated by double clicking. Any line can be selected by double clicking. Each button can be activated by clicking it once.
You can navigate through Vubis Smart by clicking on each menu and submenu to get to a function:
You can also key in the AFO number and press <enter>.
Note
Anything you type in on a menu screen will be shown at the bottom left hand side in the status line.
If a shortcut key has been defined in AFO 623, you can quickly switch from within one AFO to another AFO. See the Help for AFO 623 for more information. Within the Circulation module you can switch from one AFO to another by keying in the AFO number at any prompt.
5.1 navigation within an AFO
In the tool tip (and on the ‘shortcut to all options’) you can always see which keystroke(s) will perform the same action. If this key (combination) is followed by a *, you must also enter the line number.

In this example you can:
·
add a new item by selecting the icon ‘’ OR by typing the letter “I” followed by <enter>
·
receive an item by double clicking a line OR by selecting a line and choosing the icon ‘’
OR by typing the line number followed by <enter>
·
delete an item by selecting a line and choosing the icon ‘’ OR by typing the letter “S” followed by the line number and then <enter>
· etc.
You can always select a line on an overview screen by typing in the line number followed by <enter>.
Note
Anything you type in on an overview will be shown at the bottom left hand side in the status line.
5.2 Windows key combinations
It is also possible to sue a number of standard Windows key combinations and options within Vubis Smart.
Input forms contain buttons that can be selected with the mouse. Instead you can also perform the same action by typing in the underscored letter and holding down the ALT-key simultaneously.

In the example above you can:
·
click the button OR use ALT-N
·
click the button OR use ALT-A
· etc.
The following standard Windows keys(combinations) are also valid:
|
Key (combination) |
Purpose |
|
space bar |
Select a check box. |
|
F4 |
Open dropdown list of field. |
|
space bar |
Select item from dropdown list. |
|
UP and DOWN arrow keys |
Go up or down in dropdown list. |
|
<TAB> |
Go to the next field. |
|
<SHIFT><TAB> |
Go to the previous field. |
5.2.1 Editor functions
When you are editing fields in records you can use combinations of keys, or mouse clicks to perform certain actions.
|
Key |
Action |
|
Shift + Home |
Selects from the end of a field all the text within that field |
|
Shift + End |
Selects from the beginning of a field all the text within that field |
|
Tab |
Go to the next field |
|
Shift + Tab |
Go to the previous field |
|
Right mouse click |
View the context menu |
|
Left mouse key on an icon |
Execute the action for that icon |
|
Left mouse key on a line in a summary |
Select a line from the summary |
|
Double-click Left mouse key |
Select a line from the summary and immediately execute the most appropriate action on the screen |
|
Double-click Left mouse key |
Select the word |
Note
Within Vubis Smart it is not possible to select texts on an overview screen. This can only be done on input forms (such as when entering a bibliographic record or an order, and also in dialog windows for searching).
6 Options on result screens
On many result screens you have extra options, such as sorting, adjusting column width, changing the size of dialog boxes.
6.1 Sorting
Many overview screens (like lists of titles, items, borrowers, orders, serials issues) contain information in columns. You can sort the information displayed differently by clicking on a column header.
Note
Sorting by clicking on a column heading is not possible on screens where sorting is offered as a separate option.
When sorting a result list, the system generated line number remains the same (i.e. line 1 can end up somewhere else in the display).
Before sorting:

After sorting by title:

6.2 Adjust column width
Many overview screens (like lists of titles, items, borrowers, orders, serials issues) contain information in columns. You can adjust the width of these columns. You do this by putting the cursor on the demarcation between 2 columns. The cursor will change to a double arrow. You can now drag the column to be wider or narrower.
Standard column width:
After adjusting column width:

The system “remembers” column width in most cases.
6.3 Resizing dialog boxes
Dialog boxes appear in many places within Vubis Smart. This can be for entering a search command, entering data, showing messages. These dialog boxes have a standard size, but can be resized. You do this by placing the cursor on the edge or corner of a box. The cursor will change to a double arrow. You can now drag the box to be smaller or bigger.
![]()

With the option ‘’ (the button at the bottom, on the right) you can restore the original size.
The system “remembers” box size in most cases.
7 Options in the menu bar
The menu bar offers a number of (standard Windows) options. They are described in the sections below
7.1 ‘VubisSmart’
After choosing ‘VubisSmart’ a menu like this will be shown:
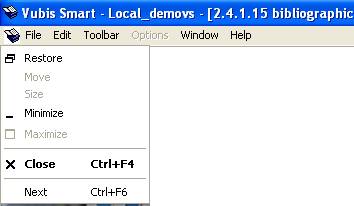
This menu offers the standard Windows options for Minimizing, Maximizing and Restoring the window size, as well as for Closing the application.
7.2 File
After choosing ‘File’ a menu like this will be shown:
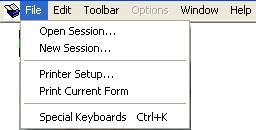
The File menu offers the following options:
·
Open Session Use this option to open a session of Vubis Smart.
·
New Session Use this option to open a new session of Vubis Smart.
·
Printer Setup Displays the standard Microsoft Windows Printer Setup window. This allows you to select a printer.
·
Print Current Form Select this to print the current screen.
·
Special Keyboards Ctrl+K Select this to display the Vubis Smart Keyboards window.
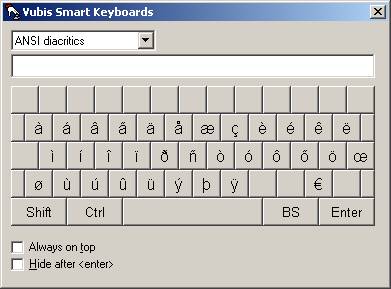
- This can be used to enter special characters such as ANSI diacritics. This option is used in Cataloguing. See the Help on AFO 111 for more information.
7.3 Edit
After choosing ‘Edit’ a menu like this will be shown:

The Edit menu allows you to Cut, Copy and Paste selected text.
You can also use the standard Windows shortcut keys (Ctrl+X, Ctrl+C, Ctrl+V).
The options on this menu are only active if you are on a screen with contains input fields.
Note
For all input forms that are shown as a separate window you can use the standard Windows shortcut keys (Ctrl+X, Ctrl+C, Ctrl+V), but this menu is not active.
7.4 Toolbar
The options available on the Toolbar menu depend on which AFO you are in. It offers the same options as ‘Shortcut to all options’.
7.5 Options
This part is not active.
7.6 Window
After choosing ‘Window’ a menu like this will be shown:
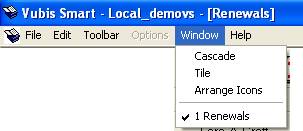
This menu offers the standard Windows options for displaying multiple Windows.
7.7 Help
After choosing ‘Help’ a menu like this will be shown:
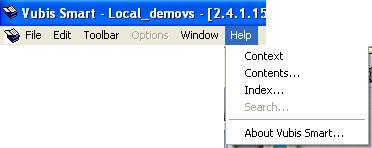
This menu offers the standard Windows options for displaying Help information. You can also display version information with the option About Vubis Smart:
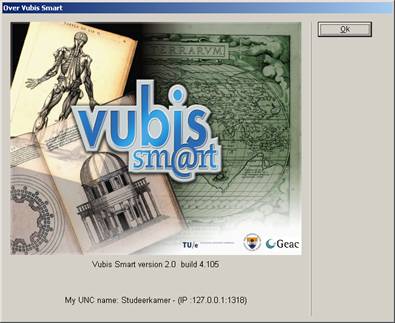
Note
This is information on the version of the client software, not the version number of the Vubis Smart application.
8 Generating output
In many places within Vubis Smart you can print information. In such cases the standard dialog box for generating output will be shown:

The number of options available is determined via parameters in AFO 621. Consult the Help for this AFO for more information.
Possible options are:
Screen: Select this option to be able to send output to the screen. Usually this will be done via Windows Notepad.
Browser: Select this option to be able to send output to your Internet browser.
Spreadsheet: Select this option to be able to send output to a spreadsheet program.
Word processor: Select this option to be able to send output to a word processing program.
Printer: Select this option to be able to send output to a printer. The system offers you the possibility of using any (network) printer available to your workstation. The printers available to your workstation are specified at the network level (by the system administrator).
File: Select this option to be able to send output to a file on a hard disk (or floppy drive). The system offers you the possibility of saving a file to any (network) disk to which your workstation has access. In other words, the access to specific hard disks is specified at the network level (by the system administrator).
Email: Select this option to send output to a mail program available to your workstation or on the network.
Printer spooler (‘raw’ printing): Use this type of printing to print directly to the printer spooler. If you do this, the system will circumnavigate the standard Windows print queues and direct the output directly to the printer. This may be useful to print to older printers such as matrix printers.
Default input file: Select this option to specify the name of and path to a default input file.
Delimited output: the default delimiter is a comma. This cannot be changed interactively.
9 Starting processes
In many places within Vubis Smart you can start a process. In such cases the standard dialog box for scheduling processes will be shown:

Fields on the screen
Start process: Select the method to start the process. You can choose from:
·
Online - the process will be started from your workstation and will run until completion. While this is happening you cannot use the current session of Vubis Smart to do anything else.
·
Batch - a separate process will be created to perform the action so that you can continue to use your workstation.
· Memory - a separate process will be created and placed in a queue.
Day(s) of the week: Enter the day(s) of the week when this process should run if you are running a process in memory. Monday = 1, Sunday = 7. If this process is to be run every weekday, enter an asterisk "*".
Day(s) of the month: Enter the day(s) of the month when this process should run if you are running a process in memory. This can be a regular date in any month, or a specific date. 1 = first day of the month, 8 = eighth day of the month, 6/3 = 6th March. If this process is to be run every day of the month enter an asterisk "*".
Time: Enter the time when this process should run if you are running a process in memory. Use 24 hour clock format HH:MM. If this process can be run at any time enter an asterisk "*".
Infor recommend that you do not make a time entry unless you need to ensure that processes need to be run in a particular order.
Store in permanent table: Check this box if the process should be included in the table of tasks to be run on a regular basis.
Notes
Vubis Smart assumes that there is an implicit AND relationship between the Day(s) of the week and the Day(s) of the month. If you enter 3 for Wednesday in Day(s) of the week and 15 in Day(s) of the month the process will only be run when the 15th falls on a Wednesday.
Once a process has been activated in the batch or memory mode, its progress can be monitored using AFO 642 ('Monitoring processes'). See the Help for this AFO for more information.
If you run a process as a batch the screen will not refresh to show the new date unless you back out and come back in again.
Licence information
The number of processes that can be activated, as a batch or memory job, is dependent on your Vubis Smart user licence. If the system is unable to create a separate process (because you have insufficient Vubis Smart licences), the message Process was not activated will appear. If you cannot run a process in batch mode, you can still run it online.